It was no slouch but also not a sports boat. I found myself in about the middle of the fleet and as it happened the only one in the middle of the fleet. There were faster boats dueling it out ahead as well as slower boats behind me dueling it out and I was stuck in the middle without any competition.
So with a tri I could solve the problem, my partner would come out because the boat sails flat and I could compete with the boats up in front. We never plan to sleep over night so do not need too much cabin space.
I originally looked at the Scarab 6.5, I was going to use an 18ft catamaran for the amas and build the main hull. This would quicken the build process because I only had 11 weeks annual leave owing and wanted to build it in that time. I bought an old Stingray cat and started planning only to find I was made redundant at work and out of a job.
I found another job after about 6 weeks but while out of work I did not want to commit to a project that costs money I may not have. So I sold the cat and all the bits and pieces I started to accumulate. It was on the back burner for a while.
In 2012 I put my TS on the market to sell. I sold it in early 2013. The tri project was back on again. I came across an A class cat and put a notice on boat design.net asking if it was suitable for amas. I got a mixed reaction and by the time I went back to look at the A class again it was gone. Any wonder it was only $200, less than the value of the good trailer that was with it.
I started to communicate with Michel Fedisch about a design he was working on, the Husky. It fitted the bill, fast and good looking. I did not need accommodation and was set on a day boat to race. I started to go back over all the information I had accumulated earlier on when I first started to think about a tri. And started to look for a suitable cat to use as ama's. I then came across a Hobie 20 for sale.
The Hobie 20 is a big boat, plenty of volume, solid construction, plenty of sail area. I purchased the boat and I was starting.
(2)

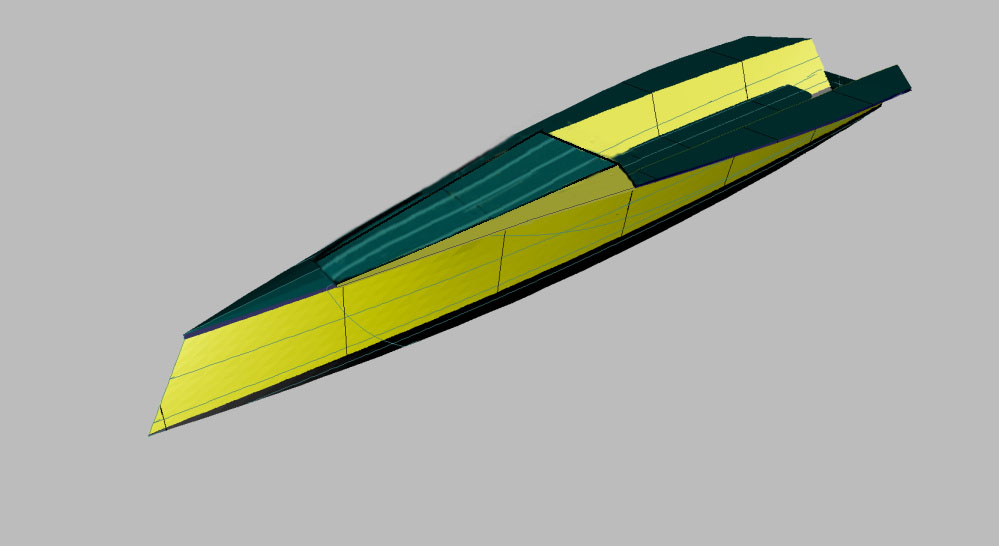
I sent Michel a heap of measurements of the H20 so he could do the design for the main hull, H20 shown above. I am now in the process of chasing up suitable timber for the stringers etc. The main hull will be constructed of 6mm ply/epoxy composite. I am a registered builder and familiar with timber so that suits me better as a building material. Although this is the first boat I have ever built a boat.
(3) 6th
June 2013
I had the first 8 sheets of ply delivered today. And went to
the local hardware to get some timber for the building frame.
(4) 22nd
June 2013
It has been a while since I have done anything and I am
chomping at the bit to get into it. Michel has had some family issues and I
started a new job which slowed us up a bit. But today I started marking out the
frames/bulkheads. I have the false transom done and the building frames in
place.

Hobie 20 to be used for amas

While I was waiting for the frame offset details to be drawn
I played around on photoshop. I added a small cabin to the freeship image I
received from Michel. I am going to build the boat with this small cabin just
to add a bit of character to the shape. It will not help getting access to the
cabin so is purely there for looks only.
(5) 30th June 2013
I spend a fair bit of time during the week as well as all
weekend building. I have the frames/bulkheads constructed and the frames are
fixed to the building frame. I have also managed to install a couple of
stringers. I will concentrate finishing the stringer installation after work
this week and hopefully be ready to plank up the hull on the weekend.
I made a few mistakes which can be seen in one of the pic’s below,
I made a frame 120mm to wide. (I read a 7 instead of a 1 so ended up making the
frame an extra 60mm wider either side at the sheer line.

Bulkheads on building frame
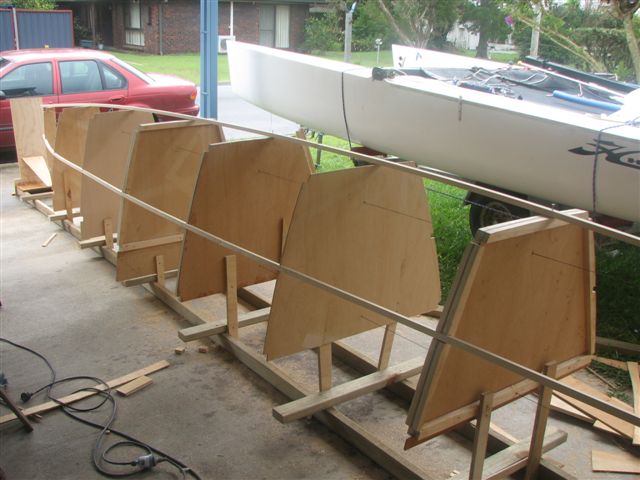
The second frame is wrong, notice the kick.

(6) 16th
July 2013
More good progress, I now have the boat planked (sheeted),
see the photo’s below. The process was reasonably straight foreword. I
temporarily screwed the sheets of 6mm plywood to the frames, scribed them and
then cut them to shape with a jig saw. I marked the glue points (stringers etc)
while the ply was tacked to the frames.
After spackling on the epoxy glue I screwed the ply back
into place using the same screw holes which ensured the ply went back into the
same location. To hold the ply tight against the frames while the glue was
setting, I used a piece of 31 x 18 molding screwed to the ply, top and bottom.
The screws were fixed about 200mm to 300mm apart. It depended how the ply
fitted against the frame as to how many screws I used. The screw holes were
patched later.
The lines came out well; I did not have to adjust any of the
frames except the one I stuffed up.
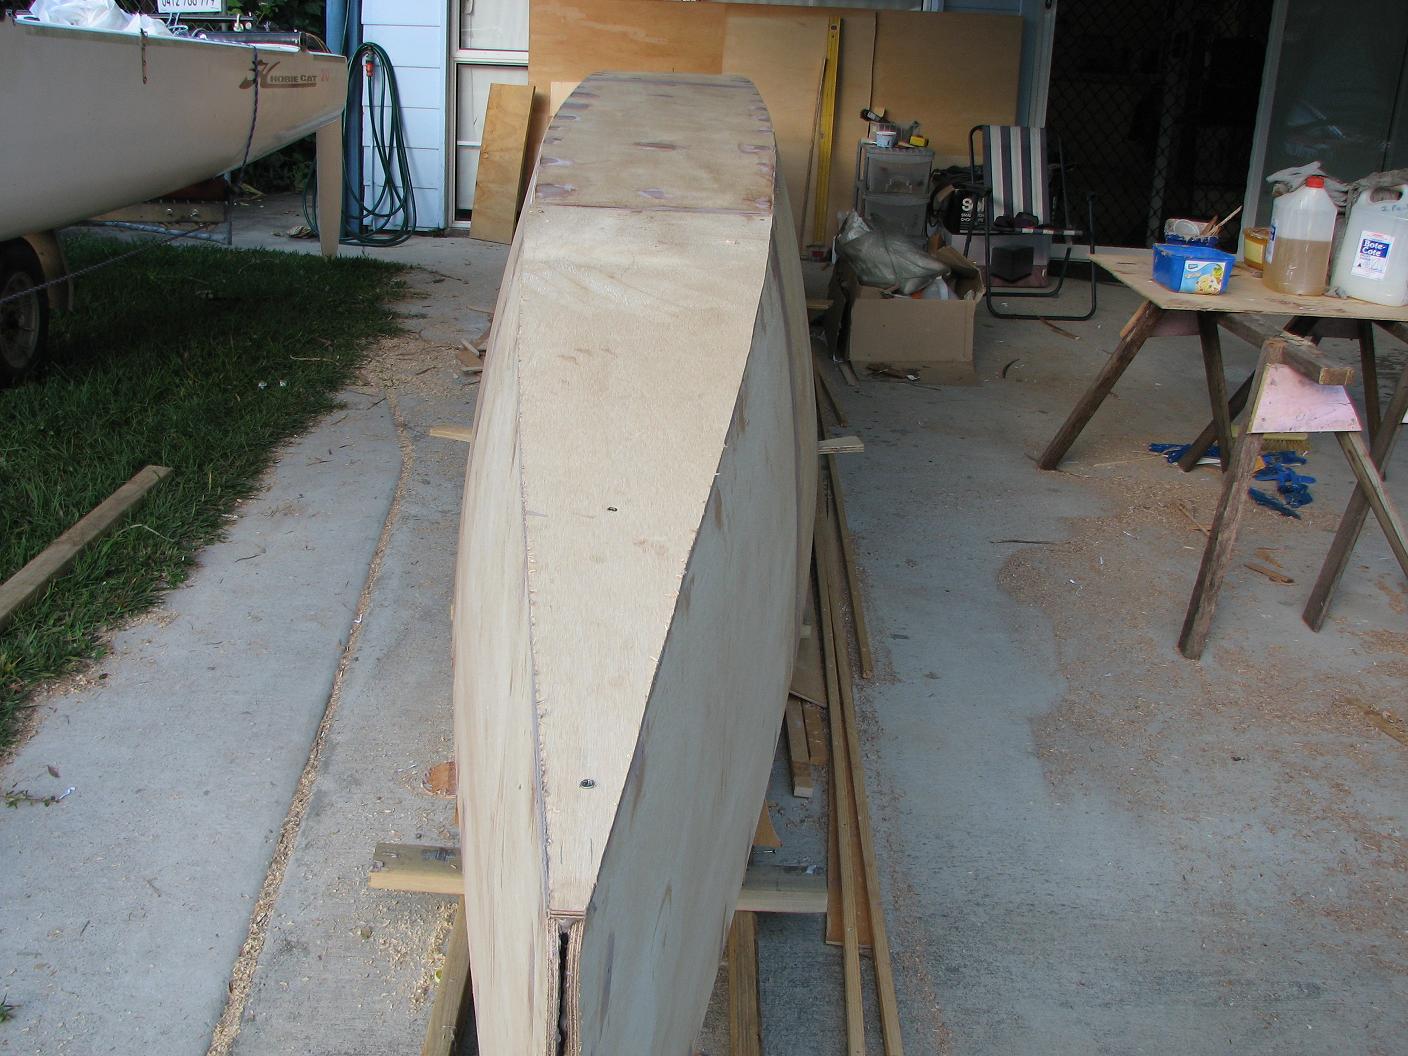
The reverse bow shown here.
To explain the decision to have a reverse bow. The Hobie 20
has a conventional bow and a lot of thought went into whether I should follow
the lines of the Hobie or go with what seems to be the modern look (looks fast
but wont make any difference I guess) and reverse the bow on the main hull. And
that is exactly the reason I went for the reverse bow, to make the boat look
as modern as possible. In the end it may be the wrong decision having one
reverse bow and two conventional shaped bows but I am stuck with it now and I
think it will look good. A person preference.
The main hull has ended up 6.2m long. That is ideal for me along with the size of the Hobie hulls it should show a good turn of speed, be
light and manageable.
I am building the boat in my carport. Not the best location
but the only one I have without renting space somewhere. That would not work
for two reasons, cost and I would not be able to work of an evening which would
slow the time to get it in the water.
This weekend I hope to get the hull sealed with epoxy, fared and the chine line taped with 200g/m2 cloth.
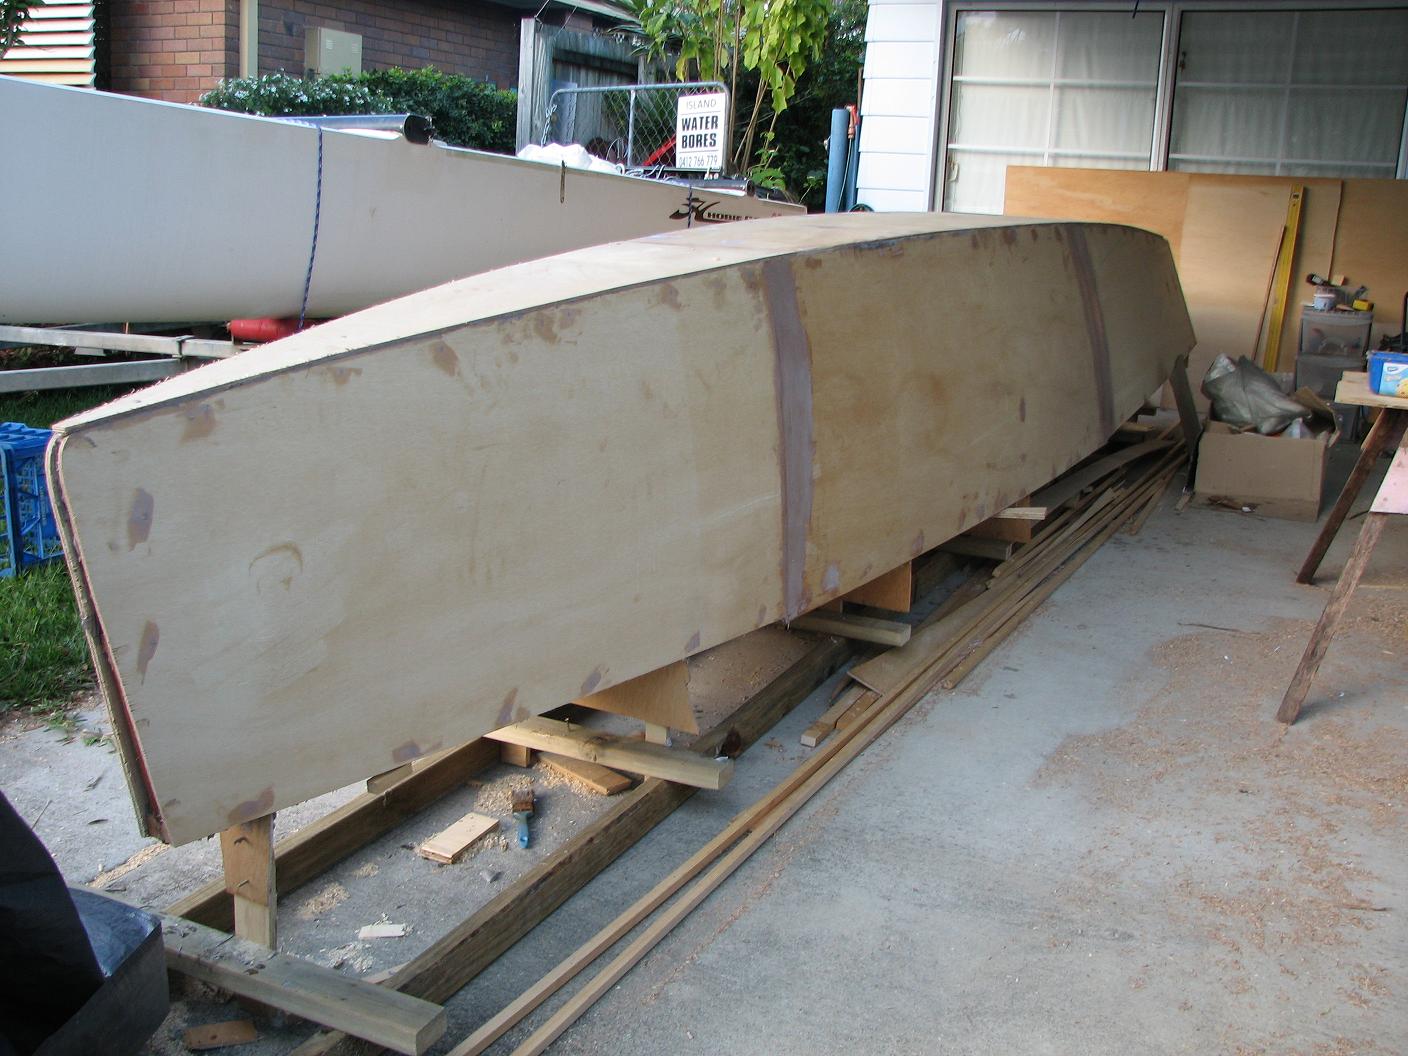
7) 1st
August 2013.
Progressing ok, I managed to get the outside of the hull
coated and sanded and turned over. I was surprised how light it was when we
turned it. I could lift it myself but it is to awkward but with the help of a
13 yo it was a piece of cake, that gives an idea of the weight of just the
hull.

8) 8th
August 2013
I bought some foam sandwich off cut panels for the wing seats.
I could have done them in ply but I think these will give a much stronger and
better finish. They were only $60 so probably worked out about the same cost as
ply.
I managed to get the wing seats and deck temporarily fitted.
They have to be scribed in, glued and glassed up to be complete. The seats are
about 320mm wide at their widest point, they flair from nothing at the front
where they taper into the hull and are full width at the transom. The cabin
sits outside the main hull on top of the wing seats and follows that line and
not the hull sheer line.


Above images indicate how the finished product should look,
main hull anyway. I have been itching to get to this point incase I was not
happy with what I was building. I am please how it looks, I have not seen
anything like it, sleek, sporty and should go pretty fast.
5th September
It’s been a while since I have updated but I have slowed up
a little. Doing all the fiddly bits. I have the deck glued in, faired and ready
to under coat, the wing seats are finished and ready to under coat as well. I
am very pleased with how it looks and the use of the foam sandwich seats. They
have stiffened the boat up sub-satanically and they look clean and smart. If
ply was used the strength would not be there and I am sure they would look
bulkier.
I turned the hull last weekend and painted it, see new
pictures. I did this because of timing, I have to use my time very wisely, all
my gluing is done at the end of the day so it cures overnight and if I wanted
to keep working on the top side I would have been gluing at 10am and then have
nothing to do until it sets, usually over night (It is winter here). So to make
the best use of my time I turned the hull and painted it.
A mistake I made, well not really a mistake but just a
problem I encountered was I final sanded the hull and put the undercoat on
Saturday, the top coat can’t go on for several hours but must be done before 3
days (written instructions) so it had to be done Sunday because I work for the
rest of the week. I checked the weather conditions and noticed a south easterly
was going to come up in the afternoon so I needed to get the paint on and
drying by then (I am building in an open carport). Sunday morning I start
sanding the undercoat but it was not dry enough, it fills the sand paper and
blobs up. I can’t sand it as well as I wanted to. The problem is I have to
paint asap so I did the best I could and put on the top coat, I used
International TopLac, one part paint, It came up ok but could have been better
if I had of been able to sand it and do a bit more prep and then paint Monday.
But all in all I am happy with it. After all I want a racing boat not a show
boat. I would rather put effort into making it go better.
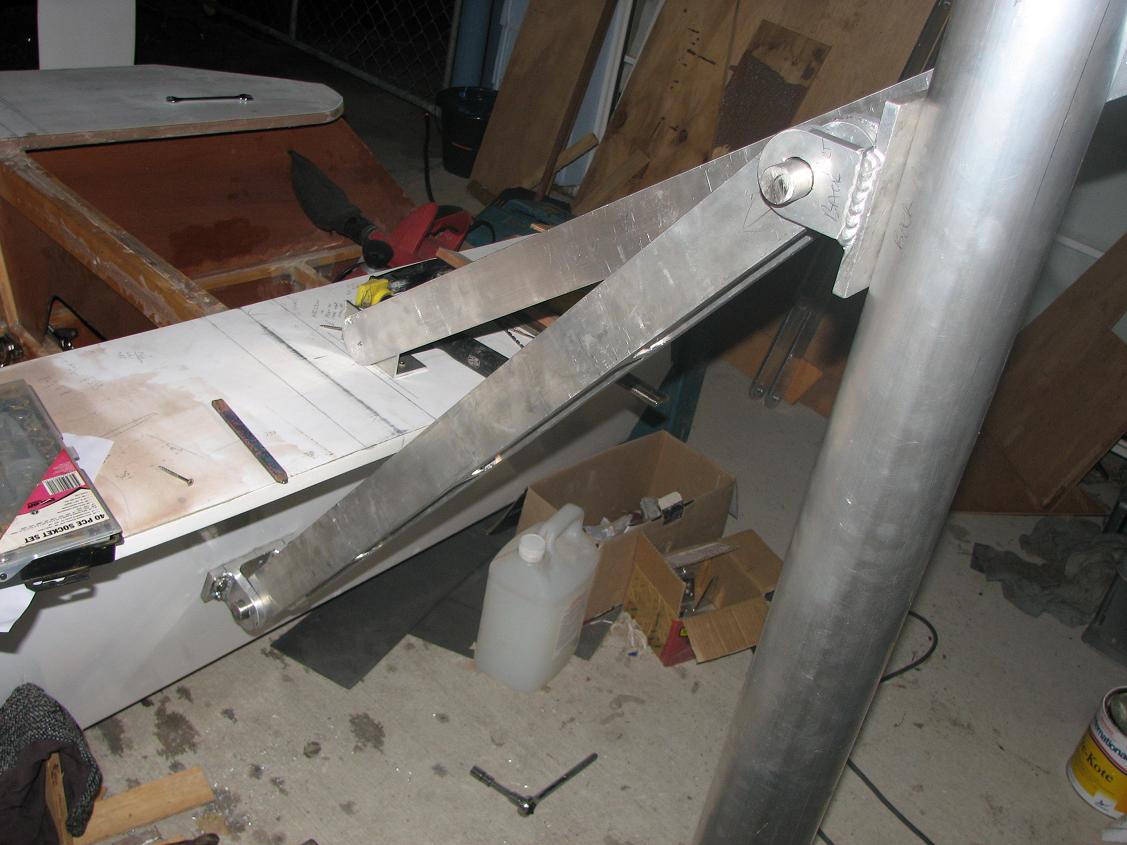
I am getting brackets made up to fold the amas under the
wing seats similar to the F boats. It is a lot more expensive than a sliding or
dismantling system but I can rig the boat myself when I go for a cruise with family.
The cost to manufacture the brackets is $900 but worth it. I expect that will come
back when I sell the boat. I purchased 100mm x 3mmm tubing for the cross beams.
The total cost is more than I thought it would be (like everything
these days) but still good value compared to buying a boat which is not completely suitable. Included in that is about
$600 for tools and $300 for another spinnaker. If I deducted them and the
folding system I would be under what I estimated at the beginning.
Boat Name: I like the name “MAMA COCHA”. MAMA PACHA means
mother earth or god of the earth in Inca mythology. And Mama cocha is the God of
the sea, the god that protects everyone that ventures onto the sea and all
creatures in it. Something different I am thinking about. My son said MAMA in
Latin now means Boob so that would be “boob god”, HAHA.


The image above is the bridge deck which I may modify.
Lowering it to about floor level just above the opening seen above. If
installed there it will still allow storage under but will also allow me better
access into the area under the deck. The bridge deck will be where I stow and
launch the asymmetric spinnaker until I get a sock on the tramp, like most
racing cats. You can see the opening but it is tucked in about 250mm under the
bridge deck. I used the Hobie cat cross beam for the mast step and stiffened it
up with a box beam inside it.

The bathroom, oops I mean boat, no I mean bathroom, the wife
won and we started a bathroom renovation which is now taking up precious boat
building time even though I have a carpenter doing it. I had to help him
re-sheet the walls Friday and then I fitted a linen cupboard Sunday so not a
lot done over the weekend.
I managed to bolt on the port side folding system. It seems
to work ok but until I bolt on the amas I am not 100% convinced it will be
fine. But that is how I am going to do it, bolt it all together and modify it
if it needs it. I can get the floor glued in after work each night now and work
on the starboard side folding system on the weekend when I have a full day to
get my teeth into it. And in day light.
A Friend bought an F22 and I saw it on the weekend for the
first time, they are beautiful and I wish I could afford one. Goes like the
clappers as well. I noticed his folding system is not as strong as mine. Maybe
I have gone over board but better than under. I cant wait to race against him.
I wish I had time to watch some America’s
cup on youtube, I might try and download a race to watch later?

21st October:
Progress is slow and it is frustrating me no
end. Family business all weekend, I have everything painted with just a few touch ups to go. The folding system is complete and I just have to tighten up
some bolts. I will finish fitting inspection ports, rigging and set up the
trailer this weekend (I hope)as well stand the mast and have everything work on the
ground. The following weekend looks like it will be the test sail (fingers
crossed)


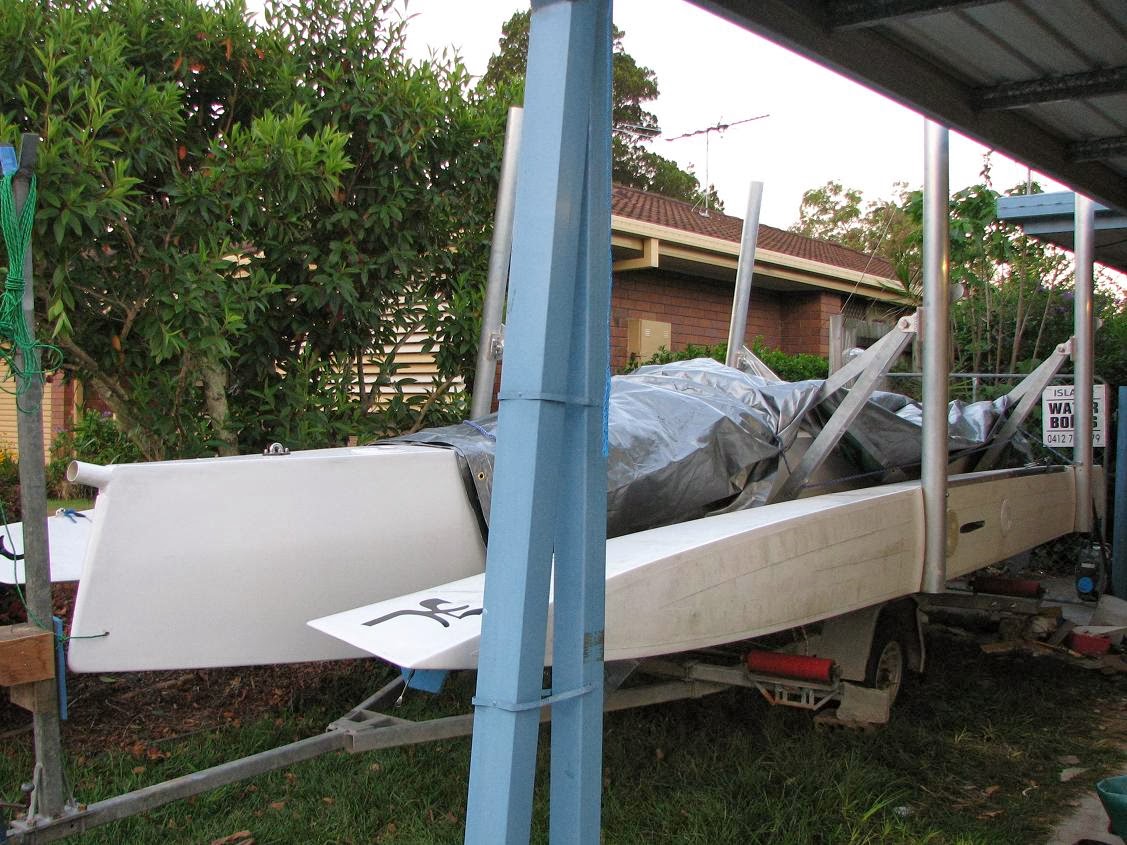
1st November:
I finally have the boat on the trailer and the carport cleaned up. I
had visitors coming for 2 weeks so had to do it. It was easy to get loaded. Now
I just have some bits and pieces to do as well as rig the mast on the boat.
That will be a couple of days work then in the water for a test sail.


8th
December 2013
Thank god it is finished. Working full time, 8
children (4 mine + 4 partners), 2 grandchildren, a bathroom reno, teaching a daughter to drive
and building a boat in 6 months was a bit too much to take on.
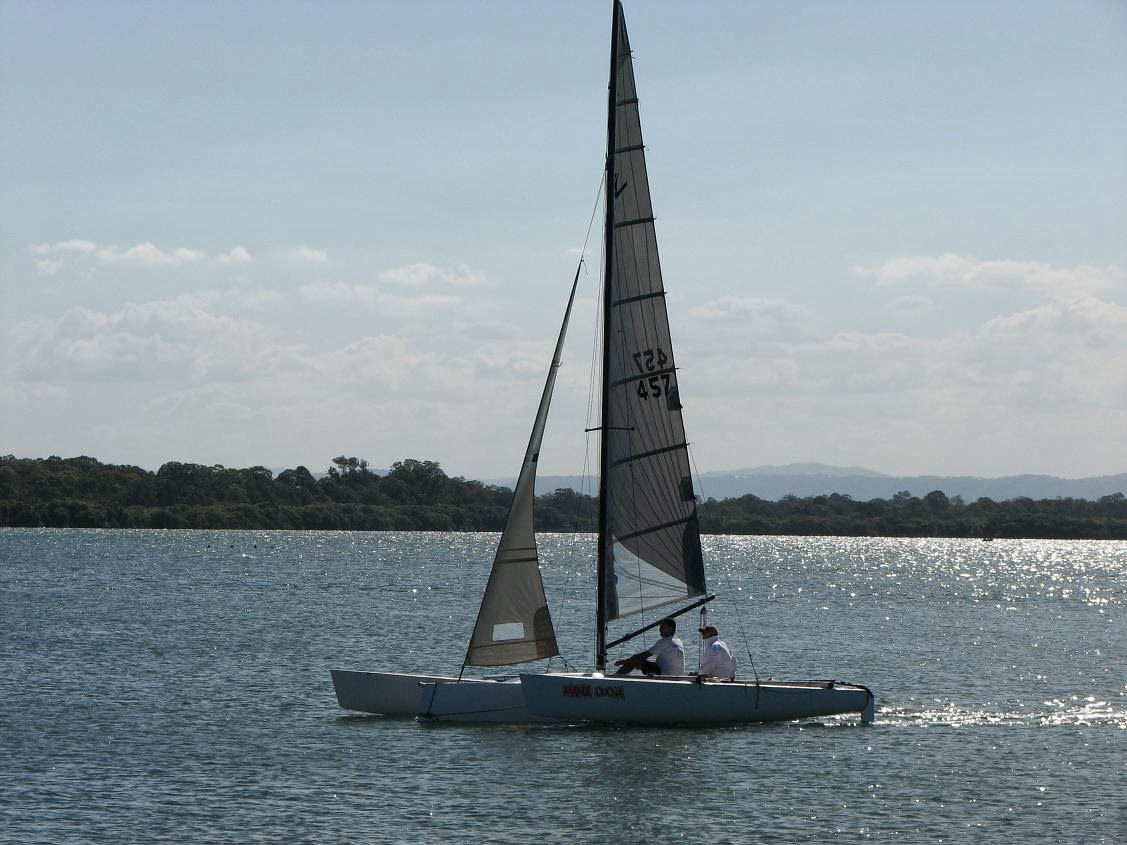
A friend and I went out in conditions that ranged from 5knts
to 14knts in the gusts. A couple of small problems like the inner stays, which
are only there to hold the mast up until un-folded, hit the spreaders and
stopped the mast from rotating properly. Easily fixed. On and off the trailer
was smooth.
I only had the GPS for 1 run to windward and 1 on a reach. We
managed 7.2knts to windward and 12.4knts on a 2 sail reach, in the gusts. Not
sure what the gust strength on that test was but it was up to 14knts max. during
the time we were out sailing.
I did not try the spinnaker. The wind was sort of across the passage
and changing around 20deg and gusting, not the best conditions for a spinnaker
test. The boat accelerated smoothly and noticeably but it was not noticeable
when the boat started to plan like it is with a mono or motor boat. With the
flat bottom it should plan but it just went faster.
The boat was not under pressure during the gusts, there was plenty more
capacity in the amas, they seemed to get down to their rocker line and that was
about it. The main hull sailed flat once up to about 7 to 8 knts. The stern gets up on the water. We mostly sat in the cockpit and not out on
the tramps.
I looked at the GPS when
we were going about 7knts and I told the friend on board, we both thought we
were going about 4knts. Not sure why we were going faster than we thought even
when going above 10knts it was the same.
There was a bit of spray coming from the folding struts, not a lot but
probably enough to be annoying during winter. I will make up some caps like the
front of an airplane wing to go over them and see if that reduces it. I think
it should because at present it is a 60mm wide aluminum flat strut slapping the
water.
All in all very exciting and happy. I have a friend with a F22 who is
staying on the island over Christmas so I intend sailing against him a few times
to see how we compare. I don’t expect to be as fast as his boat but it will be
nice to do a comparison. I will do another update after Xmas.


2/2/2014
Second sail today in the passage again. The yacht club raced
in the mouth of the passage and in a section of the bay. I thought it prudent
to do another trial because the prediction was 15 to 20knts. A strong out going
tide would have created a good sized chop out there. The two local weather
stations said we had an average of 15knts of breeze in the gusts.
It seemed to
take us ages to set up so we only had about 1.5 hours sailing. We ran down the
passage pretty square with only one jibe and only managed about 7knts of boat
speed in the gusts. It gave us a good beat though.
In the gusts going to
windward we managed 9knts and we managed that a few times. The boat felt great
at all speeds to windward and at 9knts it did not seemed pushed but I don’t
think it would have gone much faster had we tried in that breeze. Happy to do
those speeds hard on the wind with a good angle of about 45deg.
We had some
splash from the front struts so I am going to shape some PVC pipe in a foil
shape and wrap them on the strut. I tried it on the back
struts and it helped. The splash is no big deal but the PVC on the front
struts might work like it has on the back (Might not too?). I heated 90 dia PVC
pipe in my BBQ lid down, slid it up the back strut while still floppy and shaped it into
a foil shape with my hands. Simple.
1st March 2015
I have not sailed much in the last year because of crew problems, one started working away and another injured his back and I did not want to train another one. The weather has also been a problem.
My No. 1 crew is back for good and we just went out for a race to Mission Point and back (lunch in between races) We used the kite for the first time on the way up, it was light but filled beautifully. The breeze headed so it came down after about 15 minutes. The breeze remained under 10knts on a close reach and on the wind at times. Nothing special to say about going up to Mission except we started 10 minutes after the rest of the boats and picked up about 5 minutes on them.
The sail home was different, breeze gusting to 15knts and on a beam reach and varying around this angle of sailing. We hit 13knts a few times and 14 once. That was with tide assist. It was a great sail. We managed to beat the next boat by 8 minutes over a 57 minute race. It was a Ross 780, no slouch.
A new lease of life after last sail and expect to get out a lot more this year provided the weather suites.
I put packers under the front beam/ama attachment because I thought the amas sailed bow up. This seems to have made a difference in speed and the way it looks on the water (balanced)


22nd July 2015
It has been a while since I posted anything because I have not sailed as much as I would have liked. We managed to go out last weekend in the passage. Wind strength was just max 7knts. Light for this boat and the lightest I have sailed the boat in. It seemed to lack power so I will try a bigger jib. I have one that will fit and it is 2m2 larger than the standard H20 jib which will take the sail area up to about 25m2. We used the asso for most of the run up the passage, it filled nicely and jibed fine. I have posted some footage taken from the F22 in the club. I tried to delete the audio but did know how to do it.
Lessons to date:
Measure twice and cut once. This saved me more than once.
Read everything twice especially if you have never built a
boat before, like me.
Europeans cross their 7 and sometimes their 1 looks like a
seven, so re-do any numbers so you are comfortable with reading them. I read a
1 as a 7 and ended up stuffing up a frame.
After you put the building frame down, mark it or better
still fix it down to the slab or ground, you “will” knock it out of alignment.
If you make a mistake and end up with 2 lines marked on a
piece of ply, cross the wrong one out because the next day you won’t remember
which is the correct line.
Soaking out the epoxy externally. I read the best way to do
this was to use a foam roller and do it wet on wet. Well it left a lot of
sanding, at least 8 hours with a good orbital sander so I tested a bit by using
the foam roller but using a painters technique of brushing it out while still
wet. That made a huge difference.
In hindsight I would look into using foam sandwich panels
instead of ply. It might save a lot of work doing the framing. Maybe use a
system the same as Team Scarab use.
Painting and fairing: It is true that a paint job is 90%
prep and 10% application of paint. I spent a lot of time doing the prep and
still could have spent another 4 full days. Even then I don’t think it would be
perfect. If that is what you want then be prepared to prep until you think it
is ok then prep another 3 times. Otherwise be happy and go sailing quicker,
like me.